iOS Tutorial
Implementing TICoreDataSync in an iPhone, iPad or iPod touch Core Data application
This tutorial walks through adding the TICoreDataSync framework to a very simple iOS application.
The example app uses Dropbox sync via TICoreDataSync’s built in DropboxSDK-based sync classes. The example app’s user interface is deliberately basic, “designed” to demonstrate the framework with minimal distractions.
This is the iOS equivalent of the Mac app developed in the Mac Tutorial.
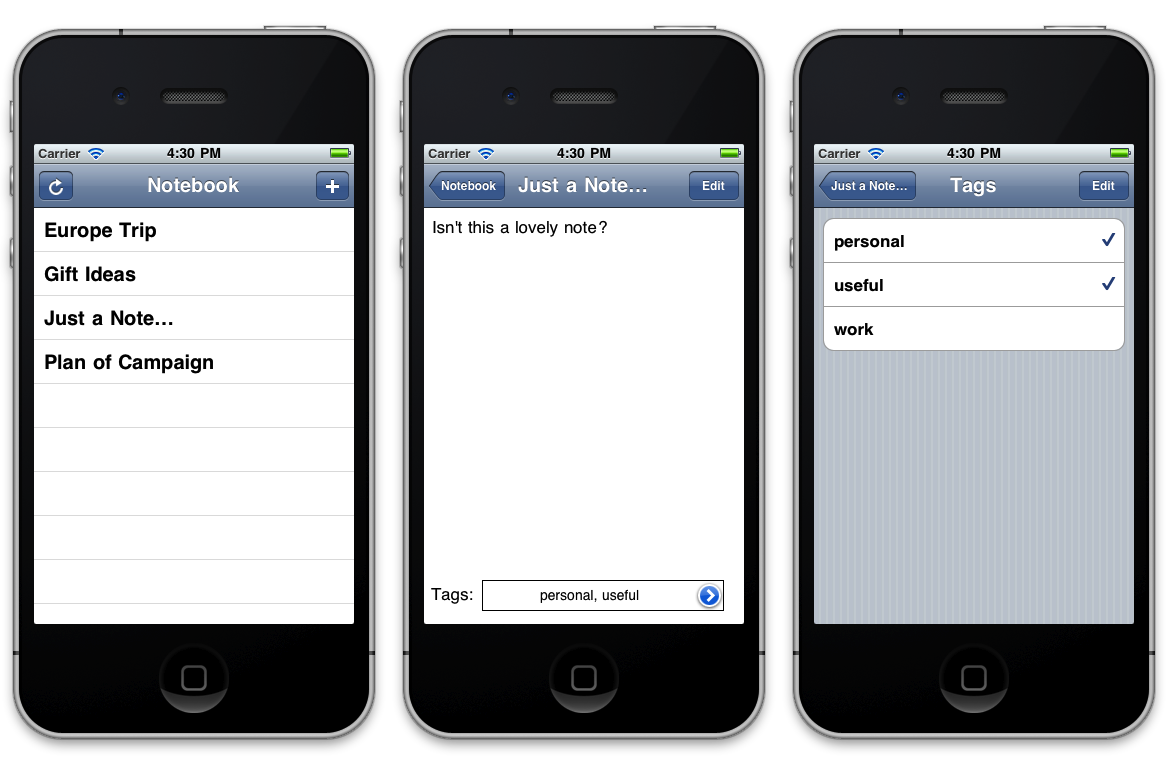
The iOSNotebook Application
The iOSNotebook application stores notes, which can be assigned tags:
The GitHub repository includes a vanilla version of the app (excluding any sync code) in Examples/Tutorial/iOSNotebook. Alternatively, feel free to use your own application.
The finished version is the same as the iOSNotebook example app, which can be found in Examples/iOSNotebook/.
Adding Necessary Files
As with the Mac tutorial, the first step is to add the TICoreDataSync files to the project. You’ll also need the DropboxSDK files, along with the Security framework, if necessary.
-
Add the TICoreDataSync directory:
Right-click on the project, choose Add Files to “iOSNotebook”…, then choose the
TICoreDataSyncdirectory (the one that contains theTICoreDataSync.hfile and six numbered directories):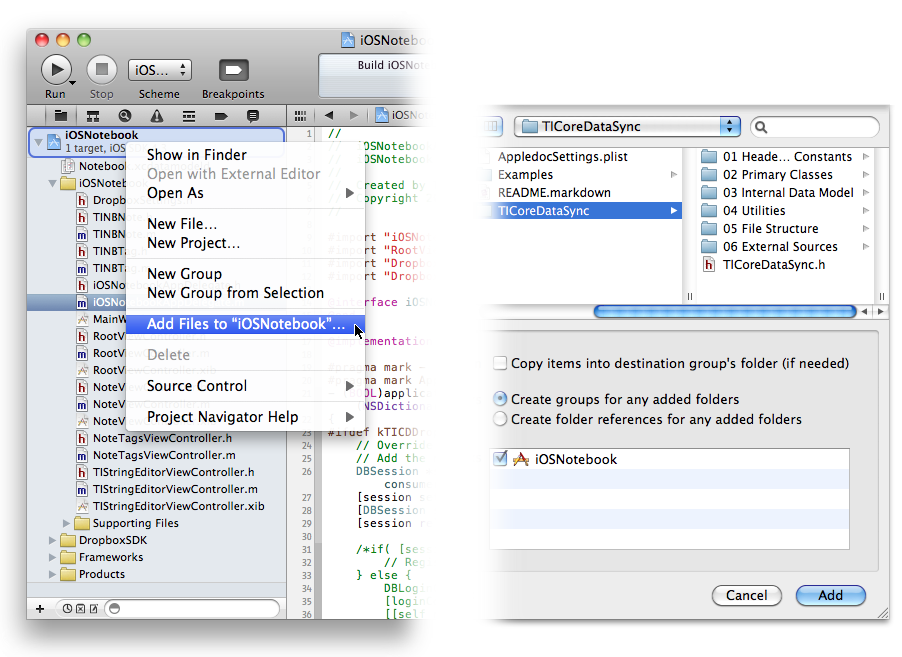
-
Add the DropboxSDK directory:
Follow the instructions as above, but add the
DropboxSDKdirectory found inside the repository at/Examples/External Sources/DropboxSDK. -
Add the Security framework:
To add a framework to an iOS project using Xcode 4, click the iOSNotebook project icon in the Project Navigator (⌘-1), select the iOSNotebook target, then the Build Phases tab, then expand the Link Binary with Libraries group:
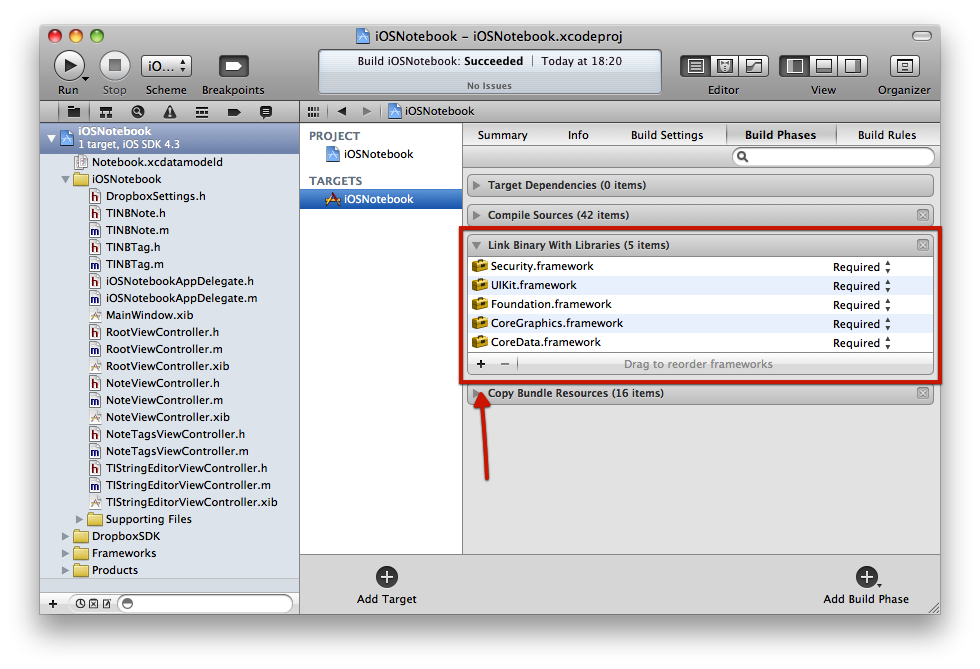
If the Security framework isn’t already shown, click the + button underneath the frameworks list and add the
Security.framework, which is needed by the encryption code, as well as the DropboxSDK.
Managed Object Requirements
In order for changes to be recognized, every managed object you wish to synchronize must be an instance of TICDSSynchronizedManagedObject and have a ticdsSyncID attribute, and every change must take place inside a TICDSSynchronizedManagedObjectContext.
-
Add the Sync Attribute to the Entities in the Data Model:
Open
Notebook.xcdatamodeldand select theNoteentity. Add a new String attribute calledticdsSyncID, and mark it as indexed:
Do the same for the
Tagentity. -
Change the Managed Object Subclass:
Both the Note and Tag entities are set to use custom subclasses rather than be plain
NSManagedObjects.Open the
TINBNote.hfile and change the@interfaceto inherit fromTICDSSynchronizedManagedObject. You’ll need to import theTICoreDataSync.hfile:#import "TICoreDataSync.h" @class TINBNote; @interface TINBNote : TICDSSynchronizedManagedObject { ...Do the same for the
TINBTagclass description. -
Change the Core Data Stack to use a Synchronized Context:
The iOSNotebook application was created using a standard Xcode template project, so the Core Data stack is set up in the
iOSNotebookAppDelegate.mfile.Import the
TICoreDataSync.hfile, then find themanagedObjectContextmethod and change it to instantiate a synchronized context:#import "TICoreDataSync.h" - (NSManagedObjectContext *)managedObjectContext { ... __managedObjectContext = [[TICDSSynchronizedManagedObjectContext alloc] init]; ... return __managedObjectContext; }If you wish, change the return type of the method, as well as the attribute and property types in the header.
Before you can do anything else with TICoreDataSync, your application will need to register an instance of an application sync manager. For this iOS tutorial, you’ll be using the DropboxSDK-based sync classes, which means that before you can register a sync manager, you’ll need to add support into the project for the DropboxSDK.
Configuring Dropbox Access via the DropboxSDK
The DropboxSDK allows access to your Dropbox files via a rest client. The TICoreDataSync classes expect you to have set up a DBSession before calling any sync manager methods, so you’ll need to add code to the iOSNotebookAppDelegate.m file to configure a session, check if it has the necessary credentials, and if not, display the login navigator provided by the DropboxSDK.
-
Set the App Delegate to Conform to the Necessary Protocols:
Import the
DropboxSDK.hfile at the top ofiOSNotebookAppDelegate.m, and modify the class extension declaration at the top of the file to indicate that it adopts theDBSessionDelegateandDBLoginControllerDelegateprotocols:#import "DropboxSDK.h" @interface iOSNotebookAppDelegate () <DBSessionDelegate, DBLoginControllerDelegate> @end -
Define Your Dropbox Developer Key and Secret:
You’ll need your own Dropbox key and secret specific to your application before you can make connections with the DropboxSDK.
For the purposes of this tutorial, you’ll need to register a “Development” application via https://www.dropbox.com/developers/apps. Once you have your secret and key for the app, add the following
#defines at the top ofiOSNotebookAppDelegate.m:#define kTICDDropboxSyncKey @"yourKey" #define kTICDDropboxSyncSecret @"yourSecret" -
Configure the Dropbox Session and Request a Login if Required:
Find the
application:didFinishLaunchingWithOptions:method. You’ll need to start by creating aDBSession, and setting it as the default session:- (BOOL)application:(UIApplication *)application didFinishLaunchingWithOptions:(NSDictionary *)launchOptions { DBSession *session = [[DBSession alloc] initWithConsumerKey:kTICDDropboxSyncKey consumerSecret:kTICDDropboxSyncSecret]; [session setDelegate:self]; [DBSession setSharedSession:session]; [session release];The DropboxSDK stores the login information once the user has logged in successfully. A
DBSessionobject will respondYEStoisLinkedif it has the necessary credentials; if so, you’ll be able to continue by registering an Application Sync Manager. If this is the first time the user has launched the app, you’ll need to request a login:if( [session isLinked] ) { [self registerSyncManager]; } else { DBLoginController *loginController = [[DBLoginController alloc] init]; [loginController setDelegate:self]; [[self navigationController] pushViewController:loginController animated:NO]; [loginController release]; } ... return YES; }You’ll write the
registerSyncManagermethod in the next main section. -
Implement the Session and LoginController Delegate Methods:
The DropboxSDK delegate methods you need to implement will be called when the user logs in, cancels logging in, or if there is an authorization failure (because the stored Dropbox credentials are incorrect).
Start by implementing the
DBSessionDelegateauthorization challenge method to display the DropboxSDK login controller:- (void)sessionDidReceiveAuthorizationFailure:(DBSession *)session { DBLoginController *loginController = [[DBLoginController alloc] init]; [loginController setDelegate:self]; [[self navigationController] pushViewController:loginController animated:YES]; [loginController release]; }When the user enters their credentials and logs in successfully, a
DBLoginControllerDelegatemethod will be called. At this point, you can pop the login view controller and register the application sync manager:- (void)loginControllerDidLogin:(DBLoginController *)controller { [[self navigationController] popViewControllerAnimated:YES]; [self registerSyncManager]; }If the user cancels the login controller, just pop the view controller:
- (void)loginControllerDidCancel:(DBLoginController *)controller
{
    [[self navigationController] popViewControllerAnimated:YES];
}
That’s it for the DropboxSDK implementation; next you’ll need to deal with the Application Sync Manager.
The Application Sync Manager
The TICDSApplicationSyncManager is responsible for creating the initial remote file hierarchy for your application, if necessary, as well as the hierarchy specific to each registered client device. Its delegate callbacks allow you to configure how synchronization works, including specifying whether to use encryption.
You’ll need to implement the registerSyncManager method you referenced above, as well as a few required delegate callbacks:
-
Adopt the App Sync Manager Delegate Protocol
Change the class extension at the top of
iOSNotebookAppDelegate.mto indicate that the class adopts theTICDSApplicationSyncManagerDelegateprotocol. Also add a method signature for theregisterSyncManagermethod to avoid having to worry about where you write the implementation:@interface iOSNotebookAppDelegate () <DBSessionDelegate, DBLoginControllerDelegate, TICDSApplicationSyncManagerDelegate> - (void)registerSyncManager; @endThe
TICDSApplicationSyncManagerDelegateprotocol includes a few required methods, which you’ll implement later. -
Fetch the Default Manager and Register it:
You can either allocate and initialize a new application sync manager instance, or simply request the
defaultApplicationSyncManager, which will create and keep track of one for you.Either way, you’ll need to instantiate the right sync manager type. For the DropboxSDK under iOS, this is the DropboxSDK-Based manager.
Start by implementing the
registerSyncManagermethod like this:- (void)registerSyncManager { TICDSDropboxSDKBasedApplicationSyncManager *manager = [TICDSDropboxSDKBasedApplicationSyncManager defaultApplicationSyncManager];Get the unique sync identifier for this client, and generate one if it doesn’t already exist:
    NSString *clientUuid = [[NSUserDefaults standardUserDefaults]
                        stringForKey:@"iOSNotebookAppSyncClientUUID"];
    if( !clientUuid ) {
        clientUuid = [TICDSUtilities uuidString];
        [[NSUserDefaults standardUserDefaults]
                            setValue:clientUuid
                              forKey:@"iOSNotebookAppSyncClientUUID"];
    }
Use the
UIDeviceclass to find out the name of the current device running the application. This will be used as the device description (human readable information to help a user distinguish between multiple registered devices):NSString *deviceDescription = [[UIDevice currentDevice] name];If, for some reason, you need to use a specific
DBSessionfor sync other than thedefaultSession, you would need to specify it as themanager’sdbSessionproperty here. By default, the sync managers will use thedefaultSession, which is fine for this tutorial.Finally, register the sync manager and provide the information:
    [manager registerWithDelegate:self
              globalAppIdentifier:@"com.timisted.notebook"
           uniqueClientIdentifier:clientUuid
                      description:deviceDescription
                         userInfo:nil];
}
Note that the
globalAppIdentifierparameter must be the same for every client, whether iOS or Mac. -
Implement the Required Delegate Methods:
The
TICDSApplicationSyncManagerDelegateprotocol includes three required methods; if you don’t implement these, you’ll get compiler warnings when you build the project.The first required method will be called the very first time the app is registered by any client, to determine whether to use encryption. Once this delegate method is called, the application registration process is paused so you can present UI to ask the user.
If you’ve already followed the Mac version of this tutorial and have enabled encryption, you’ll need to specify the password here. Otherwise, continue registration without using encryption:
- (void)applicationSyncManagerDidPauseRegistrationToAskWhether\
              ToUseEncryptionForFirstTimeRegistration:
                           (TICDSApplicationSyncManager *)aSyncManager
{
    [aSyncManager continueRegisteringWithEncryptionPassword:nil];
}
The second required method will be called the first time a client registers with an existing, encrypted remote sync setup. Again, provide the password if you set one in the Mac version, or use
nilto continue:- (void)applicationSyncManagerDidPauseRegistrationToRequestPassword\ ForEncryptedApplicationSyncData: (TICDSApplicationSyncManager *)aSyncManager { [aSyncManager continueRegisteringWithEncryptionPassword:nil]; }The third required method will be called when an existing, previously synchronized document is downloaded to a client. In a document-based application, you’d use this method to return a configured Document Sync Manager for that downloaded document, but since this is a non-document-based app, just return
nilas this method won’t be called:- (TICDSDocumentSyncManager *)applicationSyncManager: (TICDSApplicationSyncManager *)aSyncManager preConfiguredDocumentSyncManagerForDownloadedDocumentWithIdentifier: (NSString *)anIdentifier atURL:(NSURL *)aFileURL { return nil; }Look at the ShoppingList example application to see how this method might be implemented in a document-based app.
Once the application sync manager is registered, you’ll need to configure and register the document sync manager, responsible for synchronizing the application’s data.
The Document Sync Manager
The TICDSDocumentSyncManager is responsible for creating the remote hierarchy specific to a document, downloading and uploading the entire store, performing a sync, and cleaning up unneeded files.
In a document-based application, you have one document sync manager per document. Although the iOSNotebook application is a non-document-based application, you’ll need to think of it as being a document-based application that only ever has one document.
Typically, a document-based application would keep track of a unique document synchronization identifier for each document; the Shopping List application, for example, saves this identifier in the metadata of a document’s persistent store.
For a non-document-based application, this identifier can be hard-wired into the application. When the application sync manager has completed its registration, the document sync manager can fire up its registration.
-
Adopt the Document Sync Manager Delegate Protocol:
Start by changing the class extension at the top of
iOSNotebookAppDelegate.mby adding yet another delegate protocol,TICDSDocumentSyncManagerDelegate:@interface iOSNotebookAppDelegate () <... , TICDSDocumentSyncManagerDelegate> ... -
Keep Track of the Document Sync Manager:
Add a property declaration to the
@interfaceiniOSNotebookAppDelegate.hto keep track of the document sync manager. You’ll need to import theTICoreDataSync.hfile:#import "TICoreDataSync.h" @interface iOSNotebookAppDelegate : NSObject <...> { ... TICDSDocumentSyncManager *_documentSyncManager; } ... @property (retain) TICDSDocumentSyncManager *documentSyncManager; @endSynthesize the property and release the instance variable in the implementation:
@implementation iOSNotebookAppDelegate
...
@synthesize documentSyncManager = _documentSyncManager;

- (void)dealloc
{
    [_documentSyncManager release], _documentSyncManager = nil;
    ...
    [super dealloc];
}

@end
You need to keep a reference to the document sync manager so that you can initiate future tasks like synchronization.
-
Register the Document Sync Manager:
Implement
applicationSyncManagerDidFinishRegistering:to trigger the creation of the document sync manager when the application sync manager has registered:- (void)applicationSyncManagerDidFinishRegistering: (TICDSApplicationSyncManager *)aSyncManager { TICDSDropboxSDKBasedDocumentSyncManager *docSyncManager = [[TICDSDropboxSDKBasedDocumentSyncManager alloc] init];Again, if you need to use a different
DBSessionfrom thedefaultSession, you should specify thedocSyncManager’sdbSessionhere; the default behavior is fine for this tutorial, as before.Register it, using a hard-wired document identifier:
    [docSyncManager registerWithDelegate:self
                          appSyncManager:aSyncManager
                    managedObjectContext:[self managedObjectContext]
                      documentIdentifier:@"Notebook"
                             description:@"Application's data"
                                userInfo:nil];
Finally, set the property (which will retain it) and release it to balance the
alloc] init]:[self setDocumentSyncManager:docSyncManager]; [docSyncManager release]; }Note that if you didn’t change the type of the managed object context property earlier, you’ll need to typecast
[self managedObjectContext]to be(TICDSSynchronizedManagedObjectContext *). -
Implement the Required Delegate Methods:
There are four required document sync manager delegate methods.
One is called if a conflict is found during the synchronization process. In a shipping app, you would probably want to ask the user how to proceed, but for this tutorial, just implement the method to continue synchronizing with the local change taking precedent:
- (void)documentSyncManager:(TICDSDocumentSyncManager *)aSyncManager
       didPauseSynchronizationAwaitingResolutionOfSyncConflict:
                                                       (id)aConflict
{
    [aSyncManager
        continueSynchronizationByResolvingConflictWithResolutionType:
                       TICDSSyncConflictResolutionTypeLocalWins];
}
Another is called to find out the location on disk of the store file to be uploaded:1
- (NSURL *)documentSyncManager:(TICDSDocumentSyncManager *)aSyncManager
        URLForWholeStoreToUploadForDocumentWithIdentifier:
                                           (NSString *)anIdentifier
                               description:(NSString *)aDescription
                                  userInfo:(NSDictionary *)userInfo
{
    return [[self applicationDocumentsDirectory]
                   URLByAppendingPathComponent:@"Notebook.sqlite"];
}
The final required delegate methods are called if the remote file structure doesn’t exist for the document at the time of registration, or if the document has previously been deleted. In a shipping application, you might want to ask the user what to do, at least if the document was deleted. For now, just implement both to tell the document sync manager to continue registration:
- (void)documentSyncManager:(TICDSDocumentSyncManager *)aSyncManager
       didPauseRegistrationAsRemoteFileStructureDoesNotExist\
               ForDocumentWithIdentifier:(NSString *)anIdentifier
                             description:(NSString *)aDescription
                                userInfo:(NSDictionary *)userInfo
{
    [aSyncManager continueRegistrationByCreatingRemoteFileStructure:YES];
}

- (void)documentSyncManager:(TICDSDocumentSyncManager *)aSyncManager
       didPauseRegistrationAsRemoteFileStructureWasDeleted\
               ForDocumentWithIdentifier:(NSString *)anIdentifier
                             description:(NSString *)aDescription
                                userInfo:(NSDictionary *)userInfo
{
    [aSyncManager continueRegistrationByCreatingRemoteFileStructure:YES];
}
Don’t run the app yet, as you need to determine what happens the first time a client tries to register.
Store Upload and Download
When a client registers, it should check whether it has existing data of its own. If not, it needs to download the most recent store that’s been uploaded by other registered clients, assuming such a store exists.
-
Keep Track of Whether to Download the Store:
Start by adding a
BOOLinstance variable and property:@interface iOSNotebookAppDelegate : NSObject <...> { ... BOOL _downloadStoreAfterRegistering; } ... @property (nonatomic, assign, getter = shouldDownloadStoreAfterRegistering) BOOL downloadStoreAfterRegistering; @endSynthesize the property in the implementation:
@implementation iOSNotebookAppDelegate ... @synthesize downloadStoreAfterRegistering = _downloadStoreAfterRegistering; @end -
Decide Whether to Download the Store:
You’ll need to add a check for existing data before the Core Data stack is set up. The easiest place to do this is just before the persistent store coordinator is created:
- (NSPersistentStoreCoordinator *) persistentStoreCoordinator { ... NSURL *storeURL = [[self applicationDocumentsDirectory] URLByAppendingPathComponent:@"Notebook.sqlite"]; if( ![[NSFileManager defaultManager] fileExistsAtPath:[storeURL path]] ) { [self setDownloadStoreAfterRegistering:YES]; } NSError *error = nil; ... } -
Download the Store After Registering:
If the store needs to be downloaded, this should be done just after the document sync manager finishes registering:
- (void)documentSyncManagerDidFinishRegistering: (TICDSDocumentSyncManager *)aSyncManager { if( [self shouldDownloadStoreAfterRegistering] ) { [[self documentSyncManager] initiateDownloadOfWholeStore]; } } -
Don’t Download at First Launch:
If this is the very first time the app has been registered by any device, you won’t be able to download the store because no previous stores will exist.
As you saw earlier, one of the required delegate methods will be called by the document sync manager to find out what to do if no remote file structure exists for a document, or if the document has been deleted.
Change your implementation of these methods to prevent the store download:
- (void)documentSyncManager:(TICDSDocumentSyncManager *)aSyncManager didPauseRegistrationAsRemoteFileStructureDoesNotExist\ ForDocumentWithIdentifier:(NSString *)anIdentifier description:(NSString *)aDescription userInfo:(NSDictionary *)userInfo { [self setDownloadStoreAfterRegistering:NO]; [aSyncManager continueRegistrationByCreatingRemoteFileStructure:YES]; } - (void)documentSyncManager:(TICDSDocumentSyncManager *)aSyncManager didPauseRegistrationAsRemoteFileStructureWasDeleted\ ForDocumentWithIdentifier:(NSString *)anIdentifier description:(NSString *)aDescription userInfo:(NSDictionary *)userInfo { [self setDownloadStoreAfterRegistering:NO]; [aSyncManager continueRegistrationByCreatingRemoteFileStructure:YES]; } -
Do Download if Client was Deleted:
If another client has previously deleted this client from synchronizing with the document, the underlying helper files will automatically be removed, but you will need to initiate a store download to override the whole store document file you have locally (as it will be out of date compared to the available sets of sync changes).
In a shipping application, you may want to copy the old store elsewhere in case the user wishes to restore it. For now, just implement the client deletion delegate warning method to indicate that the store should be downloaded.
Note that the registration process cannot be stopped at this point, so you do not need to call any
continueRegistrationmethod:- (void)documentSyncManagerDidDetermineThat\ ClientHadPreviouslyBeenDeletedFrom\ SynchronizingWithDocument:(TICDSDocumentSyncManager *)aSyncManager { [self setDownloadStoreAfterRegistering:YES]; } -
Upload an Existing Store at Document Registration:
In order for other clients to be able to download the whole store, one client will obviously need to upload a copy of the store at some point.
The document sync manager will ask whether to upload the store during document registration. For the purposes of this tutorial, implement this method to return
YES, but only if this isn’t the first time this client has been registered:- (BOOL)documentSyncManagerShouldUploadWholeStore\ AfterDocumentRegistration:(TICDSDocumentSyncManager *)aSyncManager { return ![self shouldDownloadStoreAfterRegistering]; }In a shipping iOS application, you might wish to ask the user whether they want to upload the store every time they run the app. If the user is synchronizing with a Mac client, they may prefer that only the Mac client uploads the store to save iOS bandwidth and time. But, if they are synchronizing iOS to iOS without any Mac clients, one of those iOS clients will need to upload the store every so often.
-
Handle Replacement of the Persistent Store File:
If the store file is downloaded, it will replace any file that has been created on disk.
You’ll need to implement two delegate methods to make sure the persistent store coordinator can cope with the file being removed.
First, implement the method called just before the store is replaced:
- (void)documentSyncManager:(TICDSDocumentSyncManager *)aSyncManager
            willReplaceStoreWithDownloadedStoreAtURL:(NSURL *)aStoreURL
{
    NSError *anyError = nil;
    BOOL success = [[self persistentStoreCoordinator]
            removePersistentStore:
                [[self persistentStoreCoordinator]
                       persistentStoreForURL:aStoreURL]
                            error:&anyError];

    if( !success ) {
        NSLog(@"Failed to remove persistent store at %@: %@",
                                              aStoreURL, anyError);
    }
}
Second, the method called just after the store is replaced:
- (void)documentSyncManager:(TICDSDocumentSyncManager *)aSyncManager
             didReplaceStoreWithDownloadedStoreAtURL:(NSURL *)aStoreURL
{
    NSError *anyError = nil;
    id store = [[self persistentStoreCoordinator]
              addPersistentStoreWithType:NSSQLiteStoreType
                           configuration:nil
                   URL:aStoreURL options:nil error:&anyError];

    if( !store ) {
        NSLog(@"Failed to add persistent store at %@: %@",
                                           aStoreURL, anyError);
    }
}
Updating the View Controller’s Content if the Store Changes
The Mac version of this tutorial uses bindings to keep the interface updated when the underlying data is changed. In this iOS application, you’ll need to make changes to each of the primary view controllers to adjust the interface items.
-
Update the Root View Controller:
The
RootViewControllerdisplays a standard table view of notes, and uses a fetched results controller. When the persistent stores change, the FRC will need to perform a new fetch to update the table view.Start by registering to receive notifications when the persistent store changes at the end of the
viewDidLoadmethod inRootViewController.m:- (void)viewDidLoad { [super viewDidLoad]; ... [[NSNotificationCenter defaultCenter] addObserver:self selector:@selector(persistentStoresDidChange:) name:NSPersistentStoreCoordinatorStoresDidChangeNotification object:[[self managedObjectContext] persistentStoreCoordinator]]; }Unregister for this notifiaction in
viewDidUnload:- (void)viewDidUnload { [[NSNotificationCenter defaultCenter] removeObserver:self name:NSPersistentStoreCoordinatorStoresDidChangeNotification object:[[self managedObjectContext] persistentStoreCoordinator]]; [super viewDidUnload]; }Implement the
persistentStoresDidChange:method like this:- (void)persistentStoresDidChange:(NSNotification *)aNotification { NSError *anyError = nil; BOOL success = [[self fetchedResultsController] performFetch:&anyError]; if( !success ) { NSLog(@"Error fetching: %@", anyError); } [[self tableView] reloadData]; } -
Update the Note Tags View Controller
The
NoteTagsViewControlleralso displays a standard table view, but shows the list of available tags, with checkmarks against those applied to a note. It also uses a fetched results controller.Make the same implementation changes as you did above for the
RootViewController.You’ll need to access the
managedObjectContextvia:[[self note] managedObjectContext] -
Update the Note View Controller
The
NoteViewControllerdisplays a selected note, including its title, content and tags. Different controls are displayed depending on whether or not the user is editing a note.Add similar methods to register for a notification when the persistent stores change:
- (void)viewDidLoad
{
    [super viewDidLoad];
    ...
    [[NSNotificationCenter defaultCenter]
         addObserver:self
            selector:@selector(persistentStoresDidChange:)
                name:
        NSPersistentStoreCoordinatorStoresDidChangeNotification
              object:
     [[[self note] managedObjectContext] persistentStoreCoordinator]];
}
And unregister:
- (void)viewDidUnload
{
    [[NSNotificationCenter defaultCenter]
         removeObserver:self
                   name:
        NSPersistentStoreCoordinatorStoresDidChangeNotification
                 object:
     [[[self note] managedObjectContext] persistentStoreCoordinator]];

    [super viewDidUnload];
}
Each of the controls needs to be updated, but only if the user is not currently editing it:
- (void)persistentStoresDidChange:(NSNotification *)aNotification
{
    [[[self note] managedObjectContext] refreshObject:[self note]
                                         mergeChanges:YES];

    if( ![[self editingTextView] isFirstResponder] ) {
        [[self editingTextView] setText:[[self note] content]];
    }

    if( ![[self titleTextField] isFirstResponder] ) {
        [[self titleTextField] setText:[[self note] title]];
    }

    [self updateTags];
}
Testing the Application
At this point, you’re ready to run the application to test store upload and download behavior, if you wish.
The first time you run the app on any device, you’ll find a directory is created at the root of your Dropbox, called com.timisted.notebook. This contains all the remote files used by TICoreDataSync to synchronize clients’ data. The file structure is described further in the Remote File Hierarchy document.
What’s missing at this point, however, is the main reason for using TICoreDataSync—the ability to synchronize changes made after the initial store upload/download.
Initiating Synchronization
The first thing to add is a suitable UI element to initiate synchronization.
-
Add an Action to the App Delegate:
Open
iOSNotebookAppDelegate.hand add the signature for anIBActionmethod:@interface iOSNotebookAppDelegate : NSObject <...> { ... } ... - (IBAction)beginSynchronizing:(id)sender; @endImplement the method in
iOSNotebookAppDelegate.m, like this:- (IBAction)beginSynchronizing:(id)sender { [[self documentSyncManager] initiateSynchronization]; } -
Add a Synchronize Button in the User Interface:
The easiest place to add a synchronize button is in the navigation bar of the root view controller.
Open
RootViewController.m, and set the left button to be a refresh button, set to target thebeginSynchronizing:method on the app delegate:- (void)viewDidLoad { ... UIBarButtonItem *syncButton = [[UIBarButtonItem alloc] initWithBarButtonSystemItem:UIBarButtonSystemItemRefresh target:[[UIApplication sharedApplication] delegate] action:@selector(beginSynchronizing:)]; self.navigationItem.leftBarButtonItem = syncButton; [syncButton release]; ... } -
Merge Changes Made During Synchronization:
When TICoreDataSync applies changes made by other clients, it does so in a background managed object context tied to the same persistent store coordinator as your primary context (the one you supplied when you registered the document sync manager).
You’ll need to implement another delegate method in
iOSNotebookAppDelegate.mto alert you when changes are made and saved from the background context, so that you can merge them. This method passes you theNSManagedObjectContextDidSavenotification object, which you can just pass straight to the primary context:- (void)documentSyncManager:(TICDSDocumentSyncManager *)aSyncManager didMakeChangesToObjectsInBackgroundContextAndSaveWithNotification: (NSNotification *)aNotification { [[self managedObjectContext] mergeChangesFromContextDidSaveNotification:aNotification]; }
Testing the Application
Build and run the application, add some notes and tags, then save the document. When you initiate a save, TICoreDataSync jumps into action to create Sync Change objects to describe what’s been changed. These are stored in a separate, private managed object context.
When you initiate a synchronization, any changes made by other clients are pulled down first. Any conflicts are fixed with the local, unpushed sync changes, then the local changes are pushed to the remote.
If you built the Mac tutorial, or test the iOS app on one or more devices as well as the simulator, make sure each client pulls down the changes correctly.
Displaying Progress Indicators
It would be nice if the interface could display an animated progress indicator whenever synchronization tasks were taking place.
TICoreDataSync offers two ways to implement progress indication. For task-specific progress, you could implement every didBegin, didFinish, and didFailTo delegate method, and display suitable progress updates. Alternatively, both application and document sync managers post notifications when they start and end a task.
Let’s take the easy approach, and use these notifications.
Using the Notifications
You’ll need to register for four notifications—two posted by the application sync manager, two by the document sync manager. These are intended to be used as indications when activity increases and decreases.
For the iOSNotebook app, it seems best to indicate both application and document activity by using the status bar activity indicator.
-
Keep Track of the Activity Count:
Start by adding an integer instance variable to the app delegate to keep track of the activity count:
 @interface iOSNotebookAppDelegate : NSObject <...> {
      ...
      NSUInteger _activity;
  }
  ...
  @end
The status bar activity indicator needs to be hidden/shown according to the activity count.
-
Register for Activity Notifications:
You’ll need to register for the application sync manger notifications just before you register:
- (void)registerSyncManager
{
    ...
    [[NSNotificationCenter defaultCenter]
 addObserver:self selector:@selector(activityDidIncrease:)
        name:TICDSApplicationSyncManagerDidIncreaseActivityNotification
      object:manager];

    [[NSNotificationCenter defaultCenter]
 addObserver:self selector:@selector(activityDidDecrease:)
        name:TICDSApplicationSyncManagerDidDecreaseActivityNotification
      object:manager];

    [manager registerWith...
}
Similarly for the document sync manager notifications:
- (void)applicationSyncManagerDidFinishRegistering: (TICDSApplicationSyncManager *)aSyncManager { ... [[NSNotificationCenter defaultCenter] addObserver:self selector:@selector(activityDidIncrease:) name:TICDSDocumentSyncManagerDidIncreaseActivityNotification object:docSyncManager]; [[NSNotificationCenter defaultCenter] addObserver:self selector:@selector(activityDidDecrease:) name:TICDSDocumentSyncManagerDidDecreaseActivityNotification object:docSyncManager]; [docSyncManager registerWith... } -
Implement the Activity Methods:
Add the following methods that will be called when notifications are posted:
- (void)activityDidIncrease:(NSNotification *)aNotification
{
    _activity++;

    if( _activity > 0 ) {
        [[UIApplication sharedApplication]
                     setNetworkActivityIndicatorVisible:YES];
    }
}

- (void)activityDidDecrease:(NSNotification *)aNotification
{
    if( _activity > 0) {
        _activity--;
    }

    if( _activity < 1 ) {
        [[UIApplication sharedApplication]
                      setNetworkActivityIndicatorVisible:NO];
    }
}
Testing the Application
Test the application once again. The activity indicator should appear whenever activity is occurring.
Adding Encryption
TICoreDataSync can encrypt all important synchronization data before it is transferred to the remote. For the iOSNotebook application, this means that all synchronization files will be encrypted before they are uploaded to Dropbox by the rest client.
If you’ve previously followed the Mac tutorial, and enabled encryption, you can skip this section.
Implementing the Encryption Methods
Encryption can only be enabled the first time any client registers to synchronize an application’s data. This means you’ll need to remove any existing remote sync data before continuing, either manually, or by asking the application sync manager to remove all data (not yet implemented in the framework).
-
Remove Existing Data:
If you’ve already launched the application and tested it by synchronizing data, you’ll need to quit the Notebook/iOSNotebook application on all clients, then delete the entire directory at
~/Dropbox/com.timisted.Notebookfrom a desktop Mac, or via the Dropbox web interface. -
Re-Implement the Initial Registration Encryption Delegate Method:
You only need to modify two delegate methods to inform TICoreDataSync that it should encrypt all important data.
The first method is called the first time any client registers to synchronize data for an application:
- (void)applicationSyncManagerDidPauseRegistrationToAskWhether\
               ToUseEncryptionForFirstTimeRegistration:
                            (TICDSApplicationSyncManager *)aSyncManager
 {
The existing implementation of this method continues registration by passing
nilas the password, meaning that the data won’t be encrypted.In a shipping application, you’d obviously want to display suitable UI to ask the user whether they want their data encrypted, and if so what password to use, but for this tutorial, just hard-wire a password.
Change the implementation of this method to specify a password:
[aSyncManager continueRegisteringWithEncryptionPassword: @"password"]; } -
Re-Implement the Initial Client Registration Method:
The above method takes care of the first time an application is registered. For additional clients registering against existing data, the framework will detect if encryption is enabled, and request a password if necessary.
Again, in a shipping application you’d need to display suitable UI to ask the user for the password (if they supply an incorrect password, this method will be called repeatedly), but for this tutorial, just hard-wire the same password.
Change the implementation of the other encryption method to specify the password:
- (void)applicationSyncManagerDidPauseRegistrationToRequestPassword\
               ForEncryptedApplicationSyncData:
                             (TICDSApplicationSyncManager *)aSyncManager
 {
     [aSyncManager continueRegisteringWithEncryptionPassword:
                                                         @"password"];
 }
Testing the Application
Once again, test that the application behaves as expected. Nothing will appear to have changed from the user experience point of view, but if you try to open any of the files on the remote (i.e., in ~/Dropbox/com.timisted.Notebook from a desktop Mac) such as a deviceInfo.plist file, you’ll find the content appears garbled and unreadable in a text editor.
-
This method makes use of an existing
↩applicationDocumentsDirectorymethod provided by the original Xcode iOS project template. If your project doesn’t already have one, you may need to add a signature for the directory method to the@interfaceor class extension to avoid compiler warnings.